File Share Setup
📄 Name: Raphael Adeshiyan
📚 Professor: Adrianna Holden-Gouveia
🏫 Course: Spring 2025 Linux Administration (CIS-245-O1A) (1322.202501)
📝 Assignment: Getting your system setput pt1
🔧 Part 1: Setting Up the File Share on CentOS
This section will guide you through creating a shared folder on your CentOS server using Samba, allowing you to access it from a Windows machine on the same network.
⚙️ Step 1: Install Samba
❓ What is Samba?
Samba is a software suite that allows Linux/Unix systems (like CentOS) to share files and printers with Windows machines. It implements the SMB/CIFS protocol, which is the standard file-sharing protocol used by Windows.
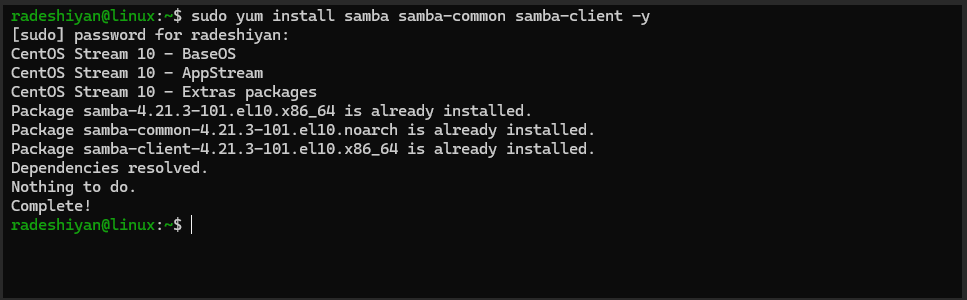
📥 Installation: Open a terminal on your CentOS server and run the following command:
sudo yum install samba samba-common samba-client -y
sudo: This command requires root privileges because you're installing system-wide software.yum: This is the package manager on CentOS. It's used to install, update, and remove software.install: This tells yum that you want to install a package.samba samba-common samba-client: These are the packages you need:samba: The main Samba server software.samba-common: Files needed by both the Samba server and client.samba-client: Tools that allow your CentOS machine to act as a client and connect to other SMB shares (not strictly necessary for just sharing a folder, but useful to have).
-y: This option automatically answers "yes" to any prompts during the installation, making the process faster.
⚙️ Step 2: Configure the Shared Folder
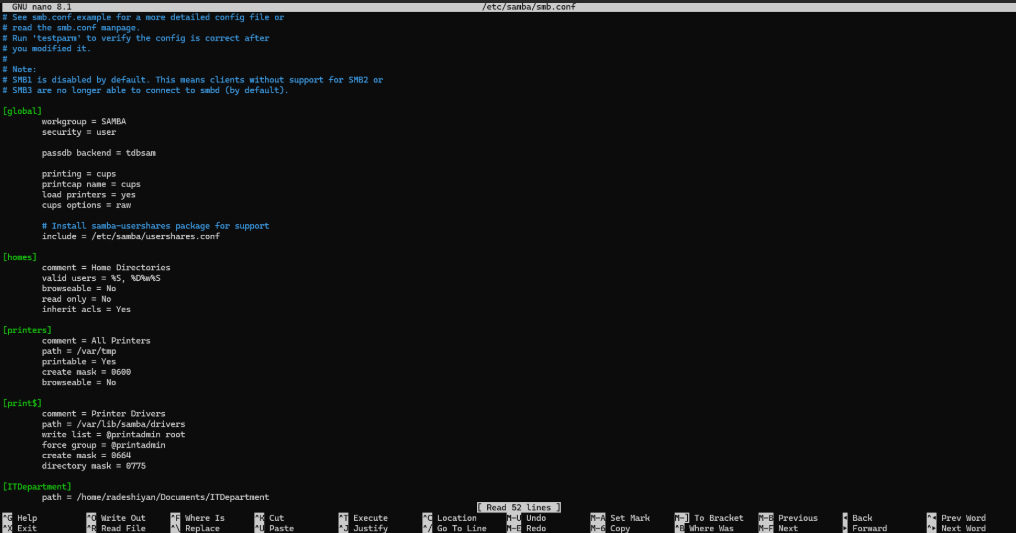
📂 Samba Configuration File:
The main Samba configuration file is located at /etc/samba/smb.conf. We'll edit this file to define our shared folder.
✏️ Open the Configuration File:
sudo nano /etc/samba/smb.conf
nano: A simple, command-line text editor. You can use other editors like vi or vim if you're familiar with them.
📝 Add the Share Definition: Scroll to the end of the file and add the following section:
[ITDepartment] path = /home/radeshiyan/Documents/ITDepartment read only = no browsable = yes writable = yes guest ok = no force user = radeshiyan
[ITDepartment]: This is the name of your share as it will appear on the network. You can choose any name you like (avoid spaces and special characters).path: This specifies the directory on your CentOS server that you want to share. In this case, it's/home/radeshiyan/Documents/ITDepartment.
Important: Make sure this directory already exists and that your user (radeshiyanin this example) has access to it.read only = no: This means users will have write access to the share. If you set it to yes, users will only be able to read files.browsable = yes: This allows the share to be visible when browsing the network.writable = yes: Allows users to write, modify, and delete files on the share.guest ok = no: This disables guest access. Only users with valid credentials will be able to access the share.force user = radeshiyan: This is very important for permissions. It makes all actions on the share appear as if they were done by theradeshiyanuser, simplifying permissions management.
💾 Save and Exit:
In nano, press Ctrl + X, then Y (to confirm saving), and then Enter to save the changes and exit.
⚙️ Step 3: Set Permissions on the Shared Folder
❓ Why are permissions important?
Linux has a strict permissions system to control who can access files and directories. We need to make sure the radeshiyan user (as specified by force user in the Samba config) has appropriate permissions on the shared folder.
📝 Change Ownership:
sudo chown -R radeshiyan:radeshiyan /home/radeshiyan/Documents/ITDepartment
chown: This command changes the owner and group of a file or directory.-R: This option makes the change recursive, applying it to all files and subdirectories within the specified directory.radeshiyan:radeshiyan: This sets the owner toradeshiyanand the group toradeshiyan./home/radeshiyan/Documents/ITDepartment: The directory you're sharing.
📝 Change Permissions:
sudo chmod -R 777 /home/radeshiyan/Documents/ITDepartment
chmod: This command changes the permissions of a file or directory.-R: Recursive, as before.777: This is a numerical representation of permissions. It gives the owner, group, and others read, write, and execute permissions. This is generally considered very permissive and potentially a security risk in a production environment, but for testing and learning in a lab, it's often used to avoid permissions issues.
✅ A more secure approach (optional):
If you want to be more restrictive, you could use 770 instead. This would give the owner and group full permissions but no permissions to others. You might then need to add the Samba user to the radeshiyan group.
⚙️ Samba User Access
🧑💻 Samba Users:
Samba maintains its own user database separate from the system's user database. You need to add a Samba user that corresponds to the system user you want to allow access to the share.
👤 Add a Samba User:
sudo smbpasswd -a radeshiyan
smbpasswd: This command manages Samba user accounts.-a: This option adds a user.radeshiyan: The username you're adding to the Samba database. It should match the system user you specified in thesmb.conffile.
🔑 You will be prompted to enter and confirm a password for the Samba user. This password can be different from the user's system password, but for simplicity, you can use the same one.
⚙️ Samba Services
🛠️ Start the Services:
sudo systemctl start smb sudo systemctl start nmb
📌 Enable the Services:
sudo systemctl enable smb sudo systemctl enable nmb
⚙️ Allow Samba Through the Firewall
🧱 Add Samba as an Allowed Service:
sudo firewall-cmd --permanent --add-service=samba
🔄 Reload the Firewall:
sudo firewall-cmd --reload
⚙️ Disable SELinux (with a Strong Warning)
⚠️ Temporarily Disable SELinux:
sudo setenforce 0
📄 Permanently Disable SELinux (Not Recommended):
sudo nano /etc/selinux/config
Change:
SELINUX=enforcing
to:
``bash SELINUX=permissive
🔄 Reboot:

```bash
sudo reboot
🖥️ Part 2: Accessing the File Share from Windows
🗂️ Step 1: Open File Explorer
📝 Step 2: Enter the Network Path
🔐 Step 3: Enter Network Credentials
📂 Step 4: Access the Share
🔗 Step 5: Map Network Drive (Optional) ---
🛠️ Troubleshooting
❓ Can't connect? Double-check the following:
- ✅ Make sure your CentOS server and Windows machine are on the same network.
- ✅ Verify the IP address of your CentOS server.
- ✅ Ensure that the Samba services are running on the CentOS server:
systemctl status smb
systemctl status nmb - ✅ Confirm that the firewall on the CentOS server is allowing Samba traffic.
- ✅ If you didn't disable SELinux, you'll need to investigate SELinux configurations for Samba.
📝 Permissions issues?
- ✅ Make sure the
force useroption in yoursmb.conffile is set correctly. - ✅ Verify the ownership and permissions of the shared folder on the CentOS server:
ls -l /home/radeshiyan/Documents/ITDepartment
🚀 Conclusion
Following these steps will set up a fully functional Samba share on your CentOS server, accessible from a Windows machine on the same network. You’ll also have the chance to practice working with Linux permissions, system services, firewalls, and basic network configuration, which are essential skills for Linux system administration.
🧰 Final Tip
- 🛡️ While it's tempting to disable SELinux for ease, it's highly recommended to spend time learning how to configure SELinux policies correctly.
- 🔗 Consult the CentOS documentation or the Red Hat documentation for updated best practices if deploying this in a production environment.
That completes the conversion to Markdown ✅
Let me know if you need the whole thing as a downloadable .md file! 📄